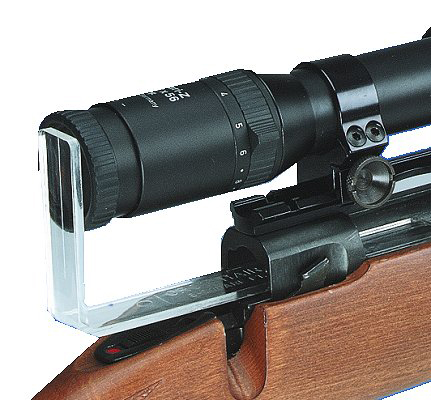
List Of Items Needed
- Heat-resistant gloves
- Vice
- Electric saw
- Dial calipers
- 90-degree shelving bracket
- Small square of Lenan plexiglass
- Straight-edged ruler
- Blow torch
- Utensil for marking
Steps For Making A Crosshair Square
When making a crosshair square, it is important to follow the steps exactly. Precise measurements are key to a useful and accurate crosshair square.
Step 1: Prepare The Plexiglass
Start by setting the dial calipers at 875 thousandths. Put the leading edge on the plexiglass, and drag the calipers straight to create a line across the sheet. The scribed line will be a guide for cutting, which the next step details.
Step 2: Cut And Sand The Plexiglass
Use an electric saw with a fine enough blade to make a precise cut. Using the scribed line as a guide, make a careful cut down the plexiglass. Be sure to leave a little extra material on the side for sanding. If the material is sanded down too much, the crosshair square will be too small to work effectively. Use a sanding tool to sand the sides of the plexiglass until it is smooth.
Step 3: Scribe The Center Line And Align The Plexiglass
Next, set the dial calipers to 437 1/2 thousandths. Placing the leading edge on the plexiglass, scribe a line down the middle. Use the straight-edged ruler to mark the height of the square, which should be exactly halfway up. This is the bending point for the plexiglass. Line up the plexiglass along the back of the shelving bracket in the vice. Make sure they are aligned perfectly before tightening it.
Step 4: Bend The Plexiglass
Before starting this step, put the heat-resistant gloves on. Start the blow torch. Run it back and forth quickly along the plexiglass. Starting with a slight pressure, bend the plexiglass forward as it becomes hotter. Keep running the blow torch back and forth across the spot where the plexiglass should bend, and carefully bend the material forward to match the shelving bracket's shape. Hold it forward to set in shape and cool before using it.
Step 5: Test The Crosshair Square
When the plexiglass is cool, remove the crosshair square. Put it in the bolt action to test it. This product should fit in most centerfire rifles. Line it up with the scope, and adjust the scope as necessary to match the crosshair square's scribed line. Learn more from the above video.
These few simple steps yield a useful tool. For more gunsmithing tips, visit SDI's YouTube channel. Gunsmithing is a great hobby for any male military spouse. Be sure to check out MachoSpouse.com for additional gunsmithing tools, tips and information for male military spouses.


